AdSense Mobile Ad

Tuesday, February 25, 2014

Creating an Apple XCode Project Using the GNU Build System (a.k.a. Autotools)

Some posts ago I wrote about two of the best portable C/C++ IDEs, NetBeans and Eclipse CDT, and their support for projects configured and built with the GNU Build System (a.k.a. Autotools). The only shortcoming of these IDEs is the lack of support for Apple frameworks and in another post I showed one possible workaround and provided the ZSH script I use, hosted on GitHub, to automatically create the soft links to include in the C/C++ include paths of your project.

Sometimes, however, it may be desirable to use Apple XCode instead of the aforementioned IDEs. Since there's no native support for the GNU Build System in XCode, some manual configuration must be performed to have XCode use the Makefile (and the other artefacts) generated by autoconf and automake for your project.

In this use case I prefer to maintain the sources completely separated from the XCode project. XCode lets you add references to the source files in a project, so that the physical location of either thing is irrelevant. Moreover, you won't risk polluting the sources with XCode-specific files and adding them by mistake to your source code repository.

Creating the project

First of all, an External Build System project must be created:

Create External Build System project

In the project options window, type the name of the project and your name: since the build is made using your autotools configuration files, these fields are irrelevant and are only used to label the XCode project:

Choose options for the project

Unless you want to use another make binary, you can leave the Build Tool path as is.

After setting up your project options, XCode will ask you the location where your new project must be created.

Configuring the Build Directory

As you know, the sources must be configured with the configure script (created by the GNU Build System) in order for them to be built on a specific platform. Since XCode has no knowledge of this mechanism, you must configure as a build directory a directory where the sources have been configured.

Once again, I prefer configuring the build on a separate directory, instead of doing it directly in the sources folder. This way, I do not pollute the source trees with object files and any other artefact created during configuration and build.

To configure your sources you must perform the following operations:
  • Go to the designated build directory of your XCode project (I usually create the build directory in the project root).
  • Run the configure script from your source root directory:
$ [sources]/configure [opts]

Now, the build directory path must be set into your project configuration:
  • Select the project root node in the Project Navigator pane.
  • Set the build directory in the Directory field, as shown in the following screenshot.

Project build directory

The configuration of the build directory is a one-time task for each target, no matter how many times you reconfigure the build in that folder. If you plan to have more than one kind of build, such as debug build and release builds (each one with different configuration options), just create multiple targets in different build directories (such as build/debug and build/release), each one configured separately. To create a new target in an XCode project, use the File/New/Target menu item.

Adding Sources to the Project

Your new XCode project will be empty and source files must be added to it. To add existing sources to your project you can use the Add files to [project-name] menu item in the File menu or in the contextual menu that appears when you right click over your project root in the Project Navigator pane. Alternatively, you can use the ⌥⌘A shortcut.

In the add files window, choose the files and/or the directories to be added. If you want to, you now have the opportunity to create groups or folder references for any added folders.

Build

Now you are ready to build your sources from XCode using the GNU Build System. And if you wonder where your build output is, in XCode the Log Navigator pane must be used.

Saturday, February 15, 2014

fsw: a File System Event Monitor for OS X and *BSD Systems

A very often demanded feature by many different types of users is the possibility of receiving an event when a change in a specific file or directory occurs. One of the most common way to consume such an event in a UNIX(-like) system would be:
  • Having a command which lets you watch a set of files or directories outputting on standard output a detailed record for each event received.
  • Piping such a process to a shell script that reacts accordingly.

Many UNIX and UNIX-like systems provide kernel facilities, subsystems and programs providing the possibility of receiving file system change events:
  • Silicon Graphic's portable FAM.
  • FreeBSD's kqueue, originated in FreeBSD and available on many *BSD systems.
  • Linux inotify.
  • Apple OS X FSEvents API.

However, unlike Linux (where inotifywatch is available), neither OS X nor kqueue-enabled *BSD systems provide a user-land program for users to take advantage of those APIs. That's why I decided to fill the gap and write a small C++ program: fsw, a shell-friendly file system event notifier for OS X and kqueue-enabled *BSD systems, hosted on GitHub.

fsw

fsw will let you subscribe to file system change events on multiple files or directories:

$ fsw file-0 ... file-n

When a file system event is received, fsw prints a complete record of the event such as

Sat Feb 15 00:26:30 2014 - /full/path/to/file:created renamed modified changeOwner isFile 
Sat Feb 15 00:26:31 2014 - /full/path/to/file:created renamed modified changeOwner xattrMod isFile

that include the following information:
  • The timestamp when the event was received.
  • The full path of the changed file or directory.
  • The list of event flags, describing the type of change that occurred.

Watchers

fsw implements three kind of watchers:
  • A watcher based on the File System Events API, available only on Apple OS X.
  • A watcher based on kqueue, an event notification interface introduced in FreeBSD 4.1 and supported on most *BSD systems (including OS X).
  • The poll watcher, a watcher which periodically stats the file system, saves file modification times in memory and manually calculates file system changes.

The limitations of fsw depend largely on the watcher being used:
  • The FSEvents watcher, available only on Apple OS X, has no known limitations and scales very well with the number of files being observed.
  • The kqueue watcher, available on any *BSD system featuring kqueue, requires a file descriptor to be opened for every file being watched. As a result, this watcher scales badly with the number of files being observed and may begin to misbehave as soon as the fsw process runs out of file descriptors. In this case, fsw dumps one error on standard error for every file that cannot be opened.
  • The poll watcher, available on any platform, only relies on available CPU and memory to perform its task. The performance of this watcher degrades linearly with the number of files being watched.

Recommendations

  • On OS X, use only the FSEvents watcher.
  • If the number of files to observe is sufficiently small, use the kqueue watcher. Beware that on some systems the maximum number of file descriptors that can be opened by a process is set to a very low value (values as low as 256 are not uncommon), even if the operating system may allow a much larger value. In this case, check your OS documentation to raise this limit on either a per process or a system-wide basis.
  • If feasible, watch directories instead of watching files.
  • If none of the above applies, use the poll watcher. The authors' experience indicates that fsw requires approximately 150 MB or RAM memory to observe a hierarchy of 500.000 files with a minimum path length of 32 characters. A common bottleneck of the poll watcher is disk access, since stat()-ing a great number of files may take a huge amount of time. In this case, the latency should be set to a sufficiently large value in order to reduce the performance degradation that may result from frequent disk access.

Configuring the Latency

Events are passed to the watching process via a callback and every callback call pass an array of events. When creating the event stream, a latency is specified and it defines how many seconds d (a double value) elapse between a callback invocation and another. fsw lets users specify the desired latency using the -l/--latency options:

$ fsw -l 5 .

In this case, fsw receives change events every 5 seconds.

Other Options

fsw currently supports the following options:
  • -f, --format-time: Print the event time using the specified format.
  • -h, --help: Show this message.
  • -k, --kqueue: Use the kqueue watcher.
  • -l, --latency=DOUBLE: Set the latency.
  • -n, --numeric: Print numeric event mask.
  • -p, --poll: Use the poll watcher.
  • -r, --recursive: Recurse subdirectories.
  • -t, --time-format: Print the event time using the specified format.
  • -u, --utc-time: Print the event time as UTC time.
  • -v, --verbose: Verbose output.

Installing fsw

fsw is a C++ project using the GNU Build System and can be installed on any supported system (OS X, v. >= 10.6 or any *BSD system supported kqueue).

Regular users should download a release tarball, uncompress it, configure it and build it:

$ ./configure
$ make

If you're a developer and have the GNU Build System installed on your machine, you can clone the git repository to get the sources:

$ git clone https://github.com/emcrisostomo/fsw.git

Then, cd into fsw directory, bootstrap the GNU Build System, configure it and build it:

$ ./autogen.sh
$ ./configure
$ make

Finally, no matter you used a release tarball or the repository sources, you can install it system-wide to /usr/local by running the following command:

$ sudo make install

If you cannot install it on /usr/local or you just prefer to install it on a private directory, you can use the following command instead:

$ DESTDIR=/installation/path make install

Documentation

fsw ships with a detailed man page you can consulting using the following command:

$ man fsw

Getting Help or Giving Feedback

If you experience some issues or simply want to give your feedback, please contact me.

Tuesday, February 11, 2014

How to Include Apple Frameworks' Headers in C/C++ Projects in IDEs Lacking Proper Support such as Eclipse CDT and NetBeans

C and C++ programmers using OS X have a nice selection of IDEs at their disposal, including Apple's XCode, Eclipse CDTNetBeans and the forthcoming JetBrains C/C++ IDE. Each one has its strengths and weaknesses, and the best choice is often dictated by personal tastes and requirements.

However, if you have ever written OS X or iOS-specific code, you already discovered that Apple uses a non-standard header organisation. This organisation stems from the concept of "framework" that, according to Apple official documentation, is:

[...] a hierarchical directory that encapsulates shared resources, such as a dynamic shared library, nib files, image files, localized strings, header files, and reference documentation in a single package.

Needless to say, C/C++ compilers and linkers for OS X have been updated to correctly use framework resources. From a C/C++ programmer perspective, nowadays the only practical difference with any other UNIX-flavour is the requirement of using specific linker flags (-framework).

The Problem with Framework Headers

There's an important catch, though. A Framework is organised in a directory hierarchy containing the header files into the Headers subdirectory, and such hierarchy can be nested: that is, a framework directory may contain a set of sub-framework subdirectories, each one organised as a self-contained framework with the same directory structure. The CoreServices framework, one of the basic OS X frameworks, contains a set of sub-frameworks including OSServices and LaunchServices, just to name a few.

Two of the most popular cross-platform C/C++ IDEs, Eclipse CDT and NetBeans, do not feature proper support for OS X frameworks yet. Eclipse CDT is making some progresses, but there still are open bugs which make Eclipse CDT practically unusable for serious OS X programming, at least as far as Eclipse CDT Kepler is concerned. You can see the status and the description of the most important Eclipse bugs in the following links:
What these bugs say, to make the long story short, is that frameworks are still unusable, especially so when they are nested.

Solutions

There is no easy solution yet, and I'm only aware of the following workarounds:
  • Using XCode.
  • Provide a "flattened" include directory containing symlinks to the header directories of each framework (at least the ones you need).

Using XCode

Using Apple's official C/C++ IDE is a solution to overcome the framework headers problem but it's hardly a "workaround"; instead, it's a switch to another IDE. Apple XCode is a good IDE for C/C++ project and it's being constantly improved, but there are important reasons not to use XCode, at least in certain situations. The most important reasons why I do not use XCode are the following:
  • I want to use the same IDE on different operating systems, and XCode is available only on OS X.
  • I want to use an extensible IDE with a good plugin ecosystem: XCode, in my opinion, is not a good choice here.
  • I want to use an IDE that supports the GNU Build System (AKA GNU Autotools). I've tried many times to maintain such projects with XCode but I couldn't find an efficient workflow.

Provide a Flattened Include Directory

A real solution to the headers problem is providing an alternate include directory that your IDE may correctly scan and parse. Let's clarify the reasons why the problem originates in order to understand the rationale behind this solution. The framework directory organisation is tricky because of the following reasons (none of which is taken into account by the above-mentioned IDEs):

  • A framework root directory is named after the framework to whose name the suffix .framework is added.
  • Headers are found into the Headers subdirectory of the framework root.
  • As explained in the previous section, frameworks can be nested.
Nested frameworks are particularly tricky and I'll illustrate it with an example. This statement:

#include <CoreServices/CoreServices.h>

is supposed to do include the CoreServices.h file, located into the Headers subdirectory of the CoreServices framework root directory (CoreServices.framework), which is located in one of the operating system framework search path:
  • /System/Library/Frameworks
  • /Library/Frameworks
Recent Eclipse CDT releases, for example, are able to do this correctly. Nevertheless, they do not work correctly when a framework header uses a nested framework header. The problem with nested frameworks is that this statement (locate into the CoreServices.h file)

#include <OSServices/OSServices.h>

is supposed to include the OSService.h file, located into the Headers subdirectory of the OSServices framework root directory. But this framework is not located into the framework search path, but it's nested (as a sub-framework) into the CoreServices framework.

Both Eclipse CDT and NetBeans fail to interpret this kind of statements correctly, and as a consequence header files are not properly found nor scanned.

The easiest way to trick the IDE into including the files "correctly" is the following:
  • Providing a new include directory.
  • The include directory will contain symbolic links to the header directories of each required framework (and all its sub-frameworks).
  • The name of the symbolic links will be the framework name, stripping the .framework suffix.
This way, when the IDE sees the #include statement of a nested header such as

#include <OSServices/OSServices.h>

it will be able to find the OSServices.h header file by following the OSServices symbolic link, which takes to the sub-framework include directory.

Automating the Creation of the Symbolic Links to the Header Directories

To automate this task I've written a shell script you can find in this GitHub repository. What it does is creating all the relevant links in the current directory. For example, the following command:

$ link-osx-framework-headers.zsh CoreServices

creates the following symbolic links (ls output stripped):

$ ls
AE
CarbonCore
CoreServices
DictionaryServices
LaunchServices
Metadata
OSServices
SearchKit

each one linking to the corresponding include directory, including for nested sub-frameworks:

$ ls -l OSServices 
OSServices -> /System/Library/Frameworks/CoreServices.framework/Versions/A/Frameworks/OSServices.framework/Headers

Listing the Available Frameworks

If you do not remember the name of a framework you need you can have the script list all the available frameworks by simply invoking it with no parameters:

% link-osx-framework-headers.zsh
/System/Library/Frameworks/AGL.framework
/System/Library/Frameworks/AVFoundation.framework
[...snip...]
/Library/Frameworks/iLifeSlideshow.framework
/Library/Frameworks/iTunesLibrary.framework

Configuring the IDE

To have your IDE scan the newly created include directory, you have to configure it appropriately. Typically every C/C++ IDE will let you add include paths, where header files are searched. In the case of Eclipse CDT, for example, you can:
  • Right-click a project and choose Properties (⌘I on OS X).
  • Navigate to the C/C++ General/Paths and Symbols pane.
  • Choose the Includes tab (the first one).
  • Add the include directory for your language (C, C++ or both).
Eclipse let you add directories of different kinds:
  • Workspace.
  • File system.
If the directory containing the symbolic links is into the project root, you can include it as a Workspace path, otherwise specify its path as a File System directory. In the following screenshot you can see a workspace include path:

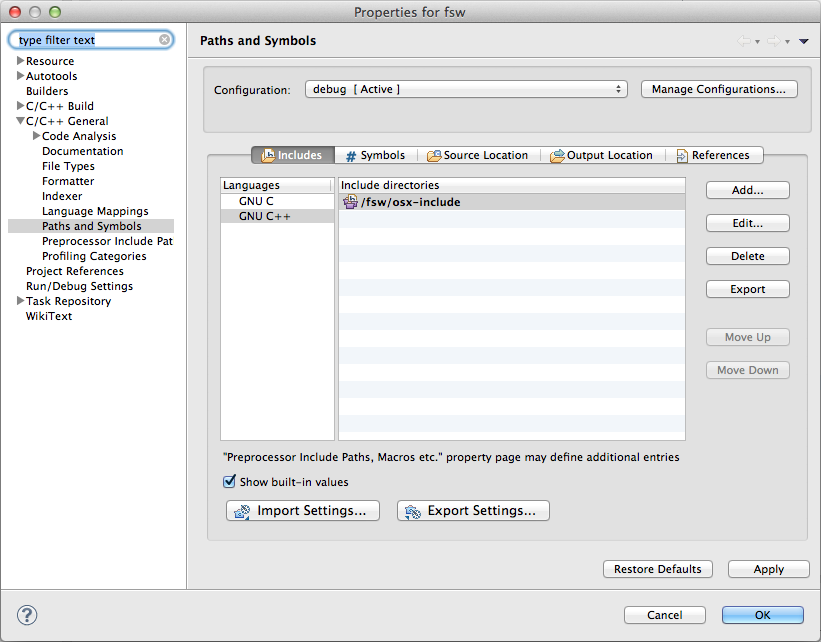
Eclipse CDT - C/C++ Include Path

Making a System-Wide Include Directory

You could be tempted to make a single include directory with symbolic links for all the framework. That's easy to do:
  • Have link-osx-framework-headers.zsh list all the frameworks.
  • Pipe it through a while read loop.
  • Have link-osx-framework-headers.zsh create each links for each framework.
In shell parlance (using Z Shell):

$ exec zsh
$ link-osx-framework-headers.zsh | \
  while read fmk ; do \
    link-osx-framework-headers.zsh ${${fmk:t}:r} ; \
  done

The workspace include directory still is my favourite option. On the one hand you have to make one include directory for each project and configure each project individually, but on the other hand you are just including the frameworks you really use, thus reducing the quantity of files scanned by the IDE. If you use an external build system, such as the GNU Build System, I find it easier to setup the include directory alongside the Autotools configuration files, so that I keep the files seen by the IDE "in sync" with the package configuration.